Traverse Global v11.2
Locations
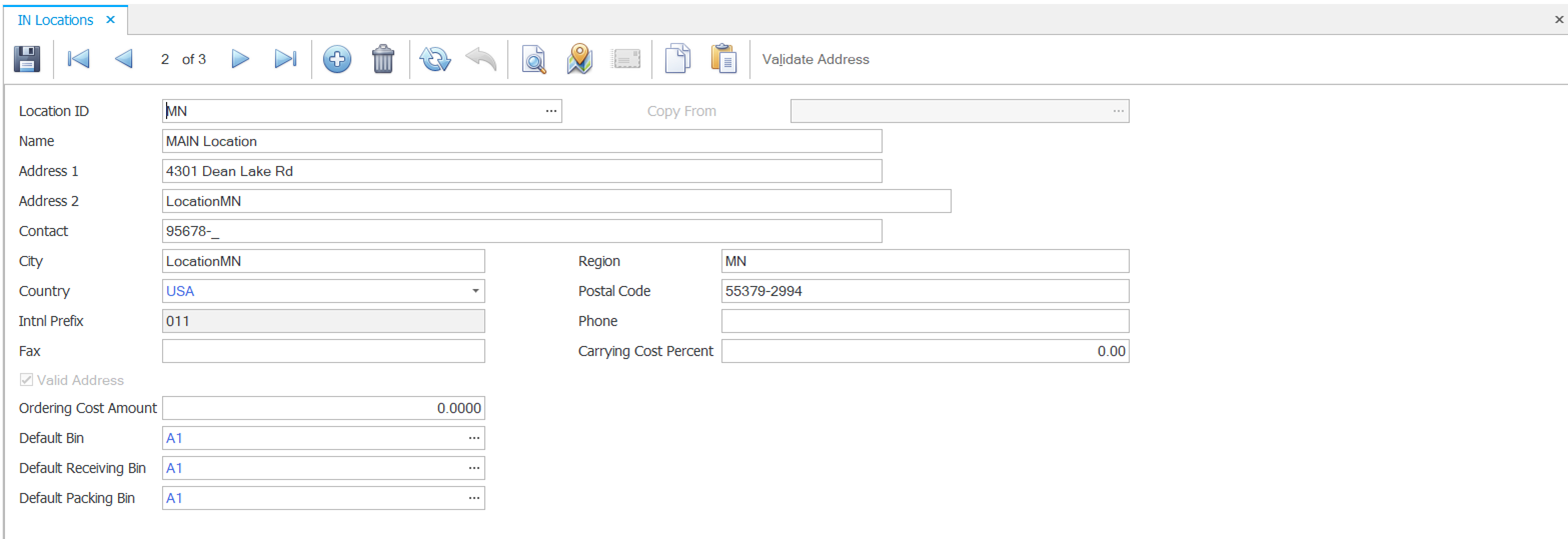
Use the Locations function to display the information for each location where you stock inventory. You can add locations or remove invalid locations, but you cannot delete a location if you store items there. You must set up at least one inventory location before you add items.

Creating a Location
- Click the New button, on the toolbar, to open a blank location record.
- Enter a new location ID in the Location ID field.
- To copy location information from a similar record for a new location record, select the existing location record from the Copy From field.
- Enter the name of the new location in the Name field.
- Enter the name of the contact person for the location in the Contact field.
- Enter the location's address in the Address, City, Region, Country, and Postal Code fields. Note: Use the System Manager Country Codes function to set up postal code masks, international prefixes, and international prefix masks.
- Enter the location's contact information in the Phone and Fax fields. Note: Use the System Manager Country Codes function to set up phone masks.
- In the Carrying Cost Percent field, enter the default percentage of the total value of your inventory to use in the EOQ (Economic Order Quantity) calculation in the reorder process. The carrying cost percent will be used in the Purchase Order application. Note: You can also enter a carrying cost percent on the Item Locations screen. The item location percentage overrides the location percentage.
- Enter the total cost of shipping, stocking, and labor in the Ordering Cost Amount field. This value will be used in the EOQ (Economic Order Quantity) calculation in the reorder process. The ordering cost amount will be used in the Purchase Order application. Note: You can also enter an ordering cost amount on the Item Locations screen. The item location amount overrides the location amount.
- Select or enter a Default Bin for the location from the drop-down list. To create additional bins for an inventory location, use the Warehouse Management Bins maintenance screen.
- Select or enter a Default Receiving Bin for the location from the drop-down list. To create additional bins for an inventory location, use the Warehouse Management Bins maintenance screen.
- Select or enter a Default Packing Bin for the location from the drop-down list. To create additional bins for an inventory location, use the Warehouse Management Bins maintenance screen.
- Click the Save button, on the toolbar, to save the new location.
Note: Click the Validate Address button in the header to validate the address. Upon successful validation, the Valid Address checkbox will be automatically selected to signify that the address has been successfully validated.
Editing a Location
- Select a location to edit from the Location ID field.
- Edit the fields as necessary.
- Click the Save button, on the toolbar, to save any changes made to the location.
Deleting a Location
- Select a location to delete from the Location ID field.
- Click the Delete button, on the toolbar, to delete the selected location.
- Click Yes at the "Are you sure you want to delete selected record(s)?" prompt.
Produce a Location List
Use the Location List function to view the item locations you have set up. Use the Locations function to change location information.